I built a tiny live train departure board for my desk. It shows real departures from any station, updates every minute, and looks like a miniature version of the dot matrix boards you see on platforms across the UK.
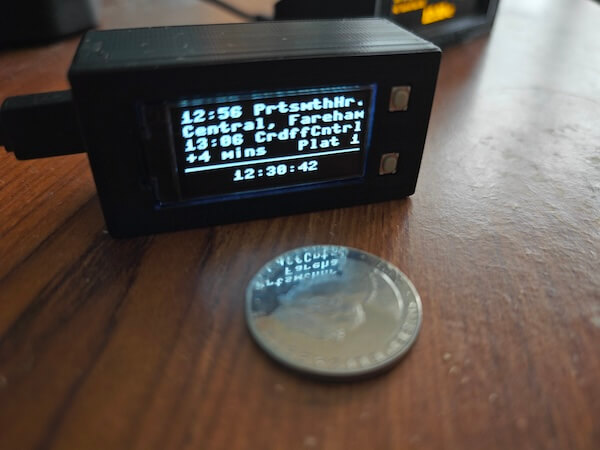
Just about space for a couple of departures, delay information, platform number and the time.
I wanted something that could be as small yet “plug and play” as possible, something anybody could just put together themselves without learning how to solder, how to set up Linux or even how to edit code.
It runs on a Raspberry Pi Pico WH connected to a 128x64px monochrome Waveshare OLED HAT. It can be set up (including getting it on to your WiFi network!) wirelessly and requires no external dependencies once the code has been deployed to it once.
The hardware
This kind of project has been done before – there are some lovely builds using Raspberry Pi Zero 2 Ws and larger, more detailed displays. But the Zero 2 W costs £15+ when you can find one (and they’ve been out of stock more often than not for years). The screens people typically use with them are £20+ as well.
The Pico W is £6, almost always available, and powerful enough for this. The Waveshare OLED is £9.
You don’t get a full Linux system, but that means no boot time, no OS updates, and no maintaining what is effectively a full computer just to display train times. For a single-purpose display that polls an API once a minute, that’s much simpler.
Total cost: around £15 – less than just the screen on a typical Zero 2 W build.
The data
The official National Rail API uses SOAP/XML. The sensible approach for memory, complexity and your own sanity is probably to avoid it entirely, use a proxy like Huxley2 that wraps the data in JSON.
I started there and it worked well, one HTTP request and parse some JSON which MicroPython can handle easily.
But a proxy has to run somewhere. There’s a public demo instance, but relying on someone else’s free service for a permanent desk widget felt fragile and a little rude on my part. So I ran my own instance on a Raspberry Pi on my home network.
This worked, but it bothered me. The whole point of using a Pico W was to have a cheap, simple, self-contained device. If I need a Raspberry Pi running 24/7 just to translate API formats, I’ve defeated the purpose. I might as well run the display off the Pi directly. And it meant the departure board only worked on my home network, I couldn’t take it anywhere without also bringing the proxy, or setting up port forwarding, or deploying Huxley2 to the cloud somewhere.
More moving parts, more things to break and more things to maintain was not the goal.
So I tried the stupid thing: calling the SOAP API directly from the Pico and parsing the XML response by hand.
MicroPython has no XML parser in the standard library. I wrote a few functions that find XML tags using string searching. It’s not robust. It doesn’t handle namespaces properly. It would make any XML purist wince. But it works enough for this purpose, and it means the only external dependency is National Rail’s own API.
I poll for updates once a minute. That’s likely to be plenty even for a real board, let alone a desktop toy.
The setup problem
Configuration can fiddly in this kind of project. You need WiFi credentials and an API token before the board can do anything useful. But if the device needs WiFi to serve a configuration page, and it needs configuration to connect to WiFi… you have a chicken-and-egg problem.
My solution was to host a “captive portal” (like the kind that are used to sign you in to public WiFi networks). On first boot, or when you hold both buttons, the Pico starts its own WiFi access point. Connect to “PDBSetup-XXXX” from your laptop/phone, and a configuration page pops up automatically. Fill in your WiFi details, station code, and API token, hit save, and the board restarts and connects to your network.
It works by running a tiny DNS server that lies: every domain lookup returns the Pico’s own IP address. When your phone tries to check if it has internet access (Apple devices hit captive.apple.com, Android hits connectivitycheck.gstatic.com), the Pico intercepts the request and serves the config form instead. Your phone sees this and shows the “sign in to network” popup.
It’s a hack, but quite a satisfying one. I’ll write more about how this works in a separate post.
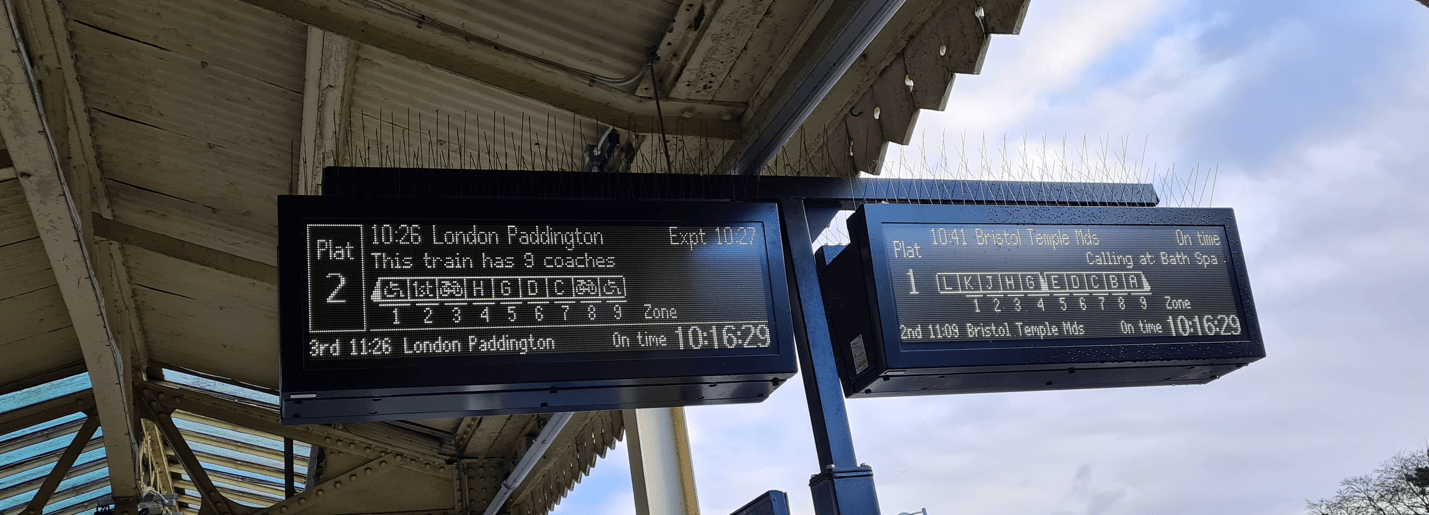
The truncation problem
A station name like “London Waterloo” is 16 characters. I’ve only got room for 14 on the screen, and I wanted to include the departure time on the same row – so something had to give.
I tried a few different options, but settled on:
- Remove vowels (a, e, i, o, u)
- But keep capital letters (start of words)
- And keep the final character if it’s a vowel
- If it’s still too long, hard truncate and add a full stop
So:
| Station | Result |
|---|---|
| Great Malvern | GrtMlvrn. |
| London Waterloo | LndnWtrlo. |
| Bristol Temple Meads | BrstlTmpl. |
| Ely | Ely |
| Birmingham New Street | BrmnghmNwSt. |
The longest station name on the UK network is “Rhoose Cardiff International Airport” at 34 characters. That becomes “RhsCrdfIntrnt.”
(It’s NOT Llanfairpwllgwyngyllgogerychwyrndrobwllllantysiliogogogoch, which is officially just “Llanfairpwll”)
The display modes
There are two buttons built in to the screen. I’ve used them to toggle between display modes:
Button 1: Scroll through the departures in to the future
Button 2: Hides the clock and shows 3 total departures on the screen
Both buttons: Enter “setup mode”
Calling points
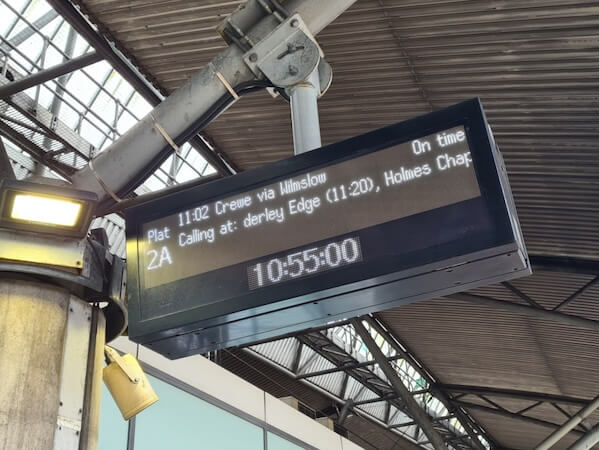
I wanted to show the calling points for each service- e.g “Calling at: Westbury, Warminster, Salisbury…” – but there’s no room for a dedicated line.
So I reuse the row that shows delay and platform. It displays the delay and platform information for a few seconds, then scrolls through the full (untruncated, making the most of the scrolling effect which real departure boards use!) calling points, then switches back.
I only fetch calling points for the top service on the board, this needs a separate API call I can make only when needed, so I’m not holding multiple lists of stations in memory. This felt like a compromise until I realised that’s exactly what a real platform board does – it only shows the calling points for the next departure anyway.
Delays and platform information
Below the scheduled time and destination name I show the current status/delay and platform infromation.
- “On Time” – self-explanatory
- “+4 Mins” – delayed by 4 minutes, more readable with limited space than “Exp 07:49”
- “Cancelled” – fits, just about
- “Delayed” – when there’s no estimated time
The fiddly bits
A few things that weren’t obvious until I hit them:
British Summer Time. The Pico has no timezone support. I calculate the last Sunday of March and October, compare against UTC, and add an hour if we’re in BST. The clock syncs via NTP at 02:00 UTC daily – after the 01:00 changeover, so I don’t have to think about the clocks changing mid-sync. This is the only timezone consideration needed for this project as it’s displaying data for trains that are physically in Great Britain!
Memory. With limited memory available, you feel every allocation. I call gc.collect() after every API response and close connections immediately.
Midnight wraparound. A train scheduled at 23:50 showing as estimated 00:05 should display “+15 mins”, not “+-1425 mins”. Ask me how I know…
Mounting flexibility. There’s a ROTATE_SCREEN constant in the code. Set it to True and the display flips 180° – which should be handy if you want the USB cable coming out the other side for your enclosure.
The case
I’m using a 3D printed case from Printables by JayFabra. It holds the Pico and OLED HAT with cutouts for the buttons and USB cable.
Polish
A few small touches that made it feel more complete:
Boot screen. On startup, a crudely drawn National Rail logo and the version number.
Helpful errors. There’s a limit to what I can show on a tiny screen, so I’ve tried to show enough to give an indication of the problem – e.g If a config file is missing or malformed, the screen tells you which file and which key.
Status LED. The onboard LED toggles during WiFi connection attempts. When you’re staring at a tiny screen wondering if it’s frozen, a blinking light is reassuring.
Empty station. If there are no departures (late at night, during engineering works or just on a quiet line), it shows “Welcome to [station name]” and the current time instead of a blank screen or an error.
What’s next
- Battery power. USB works, but I’d like to make it portable. A small LiPo and a charging circuit should be straightforward, and then it could live untethered on a shelf, or…
- Wearable. The whole thing is small enough to hang on a lanyard, or a badge, or a watch…
- Demo mode. Right now it’s useless without WiFi. I’d like a fallback that shows fake departures based on the current time, so it still looks good on a desk even when offline
- It’s still too big. The “plug and play” goal necessitated this, but wondering if I can get it working on an even smaller screen/board.
The code
I’m hosting the code on Gitlab – feel free to try it out yourself!